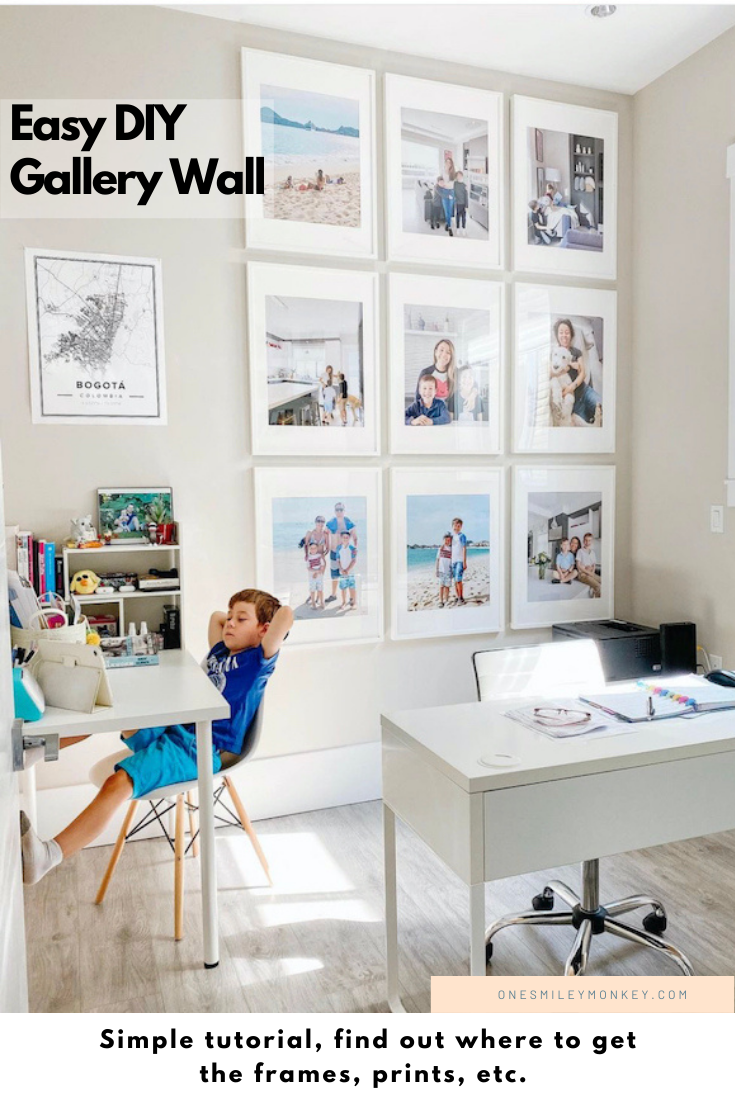
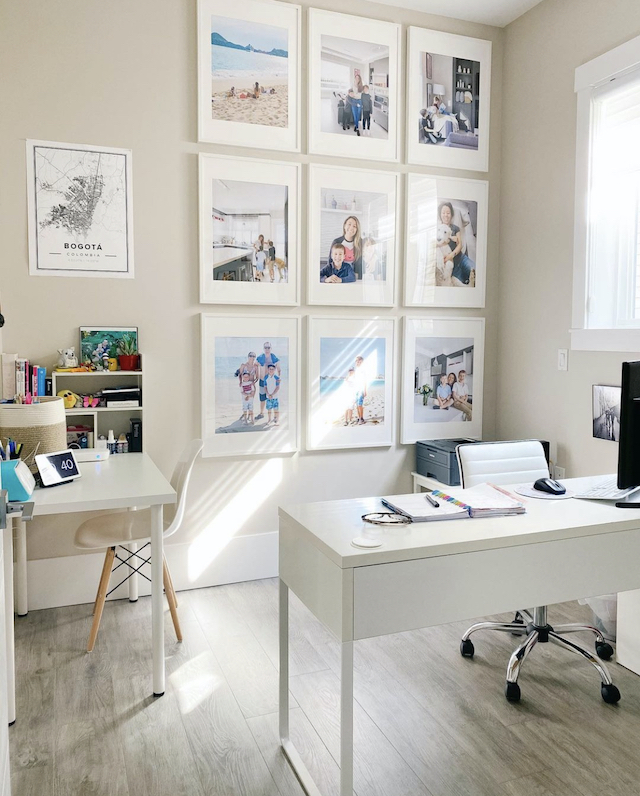
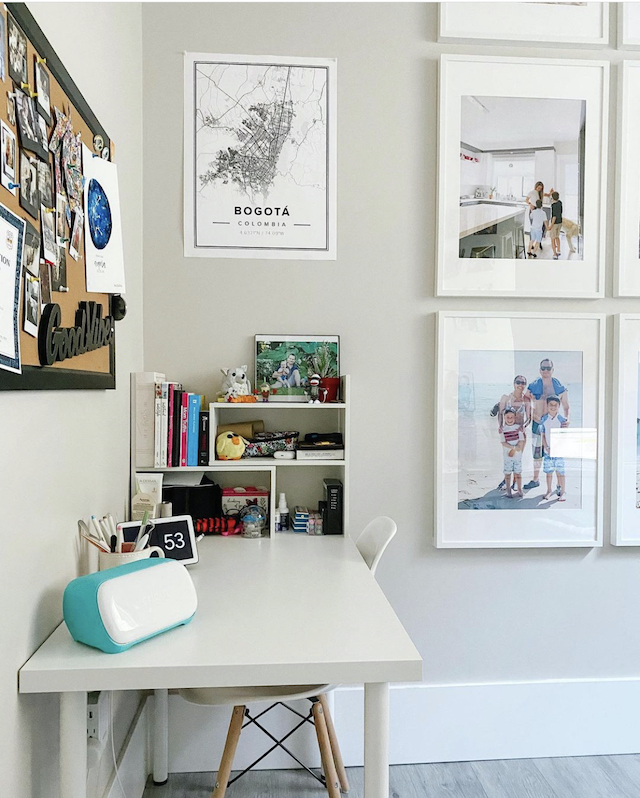
One of the most asked questions about my home office is my gallery wall. In this post, I am giving you all my tips and making a super easy tutorial so you can make your own Gallery Wall at home. I didn’t even have to leave my home as I got everything delivered directly to my doorstep as well. The best!
Hope you love it and please do share your creations if you end up making one as well. I love that I get to see all my beautiful photos in my office every day and that I can switch them around whenever I want to. All my photos in the gallery right now were taken with my iPhone 11 Pro.
Easy DIY Gallery Wall Tutorial
Easy DIY Gallery Wall Tutorial
Materials
- 9 or 12 IKEA Ribba 50x70 cm frames (the example below is based on a gallery that is 4X3)
- Photos printed at Costco (16x20") - (select "lustre" photo finish) - You can print at any photo printing studio.
- Double sided tape
Tools
- Drill
- Wall Anchors and Screws
- Spirit Level
- Measuring tape/ruler
- Pencil
Instructions
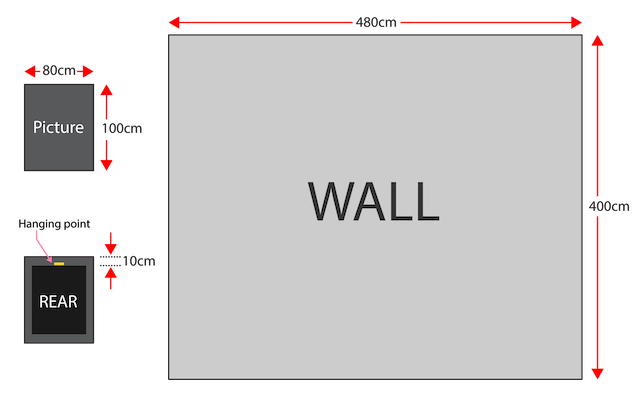
- Measure the width and height of the area you are going to install the picture array.
- Measure the width and height of one picture frame (assuming they are all the same size).
- Measure the offset from the top of your picture to where it actually hooks. This is very important to factor into the wall mounting positions.
- Now we do some math! Let’s use as an example the following values - (you can change it depending on how many frames you want to use):
Picture array 4 x 3
Wall Width: 480cm
Wall Height: 400cm
Picture Height: 100cm
Picture Width: 80cm
Hanger offset: 20cm
First, we calculate the vertical spacing:
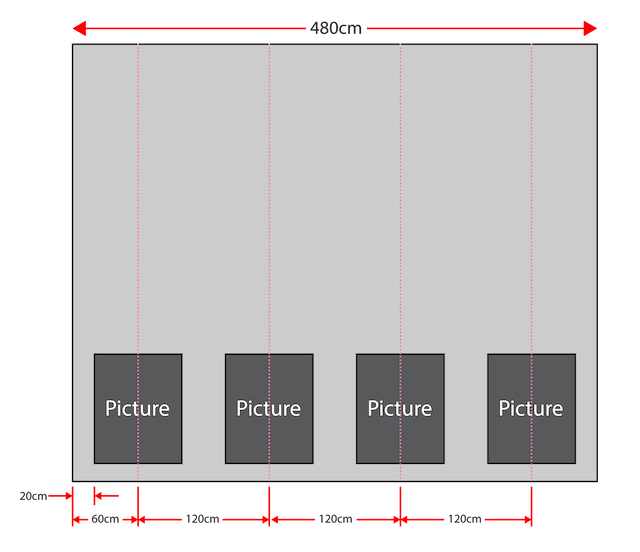
So horizontally we have 4 x Pictures = 4 x 80cm = 320cm and we subtract that from the wall width (480cm): 480cm-320cm = 160cm. Then take that number and divide by the number of picture frames width-wise (4): 160cm/4 = 40cm.
This is the spacing between each picture frame horizontally. At furthest left and right edges the space would be half of this: 40cm/2 = 20cm
Since the hanger is in the middle of the picture we need to offset our measurements.
So working left to right the first horizontal position for a hanger nail would be:
20cm(leftmost offset) + 40cm (half a picture width).
Then relative to that marking, the next three points would be 40cm+80cm=120cm apart.
Next, we calculate the horizontal spacing:
We start with a similar calculation for figuring out the spacing between the outside of the frames as we did in the first part:
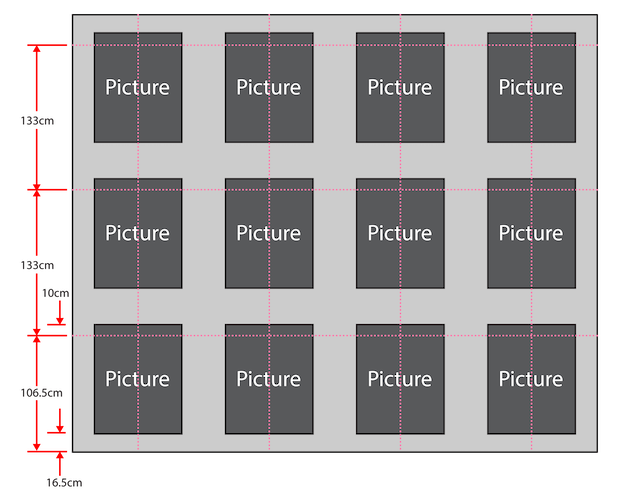
Vertically we have 3 x pictures = 3 x 100cm = 300cm and we subtract that from the wall height (400cm): 400cm – 300cm = 100cm. Then we take that number and divide by the number of picture frames height-wise (3): 100cm/3 = ~33cm (it is ok to round to an even number).
So now 33cm is the vertical spacing between the edge of each frame vertically.
At the ceiling and floor, the space is half this so 33cm/2 = 16.5cm
Since the hanging point is actually offset from the top of the frame by 20cm, we need to factor this into our vertical hole positions.
So measuring from the floor our first marker would be: half the spacing (16.5 cm) + picture frame height (100cm) – hanger offset (10cm) = 106.5cm
After that, the two other holes are each 100cm + 33cm from that first marker. - Using a tape measure try to draw this grid you have calculated very lightly with pencil and then mark the points where you will be mounting your hooks.
If you have drawn the lines you can double check them with a spirit level to make sure they are truly vertical/horizonal.
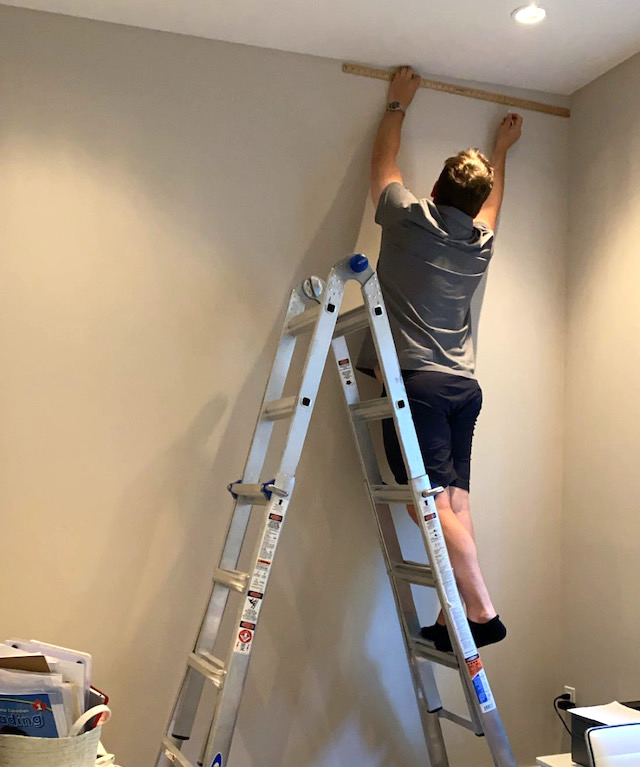
*Remember the age old adage: measure twice, drill once - With all the markings in place you are ready to drill/screw and mount your frames!
Tips: use some double-sided tape on the corners to avoid wobble.
Wall and picture
Horizontal Spacing
Vertical spacing
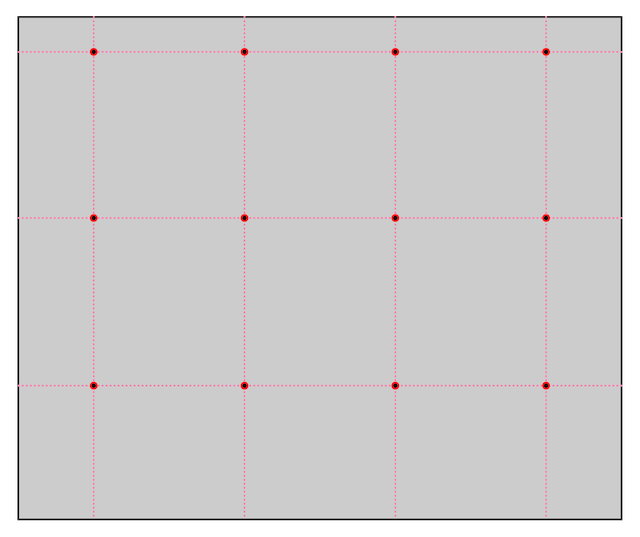
Hole pattern
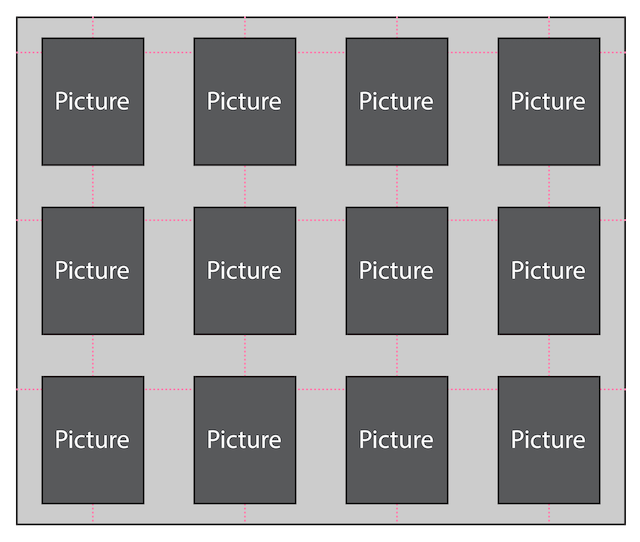
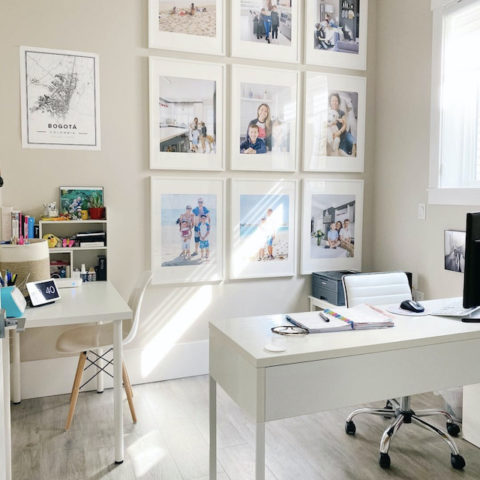
Final array
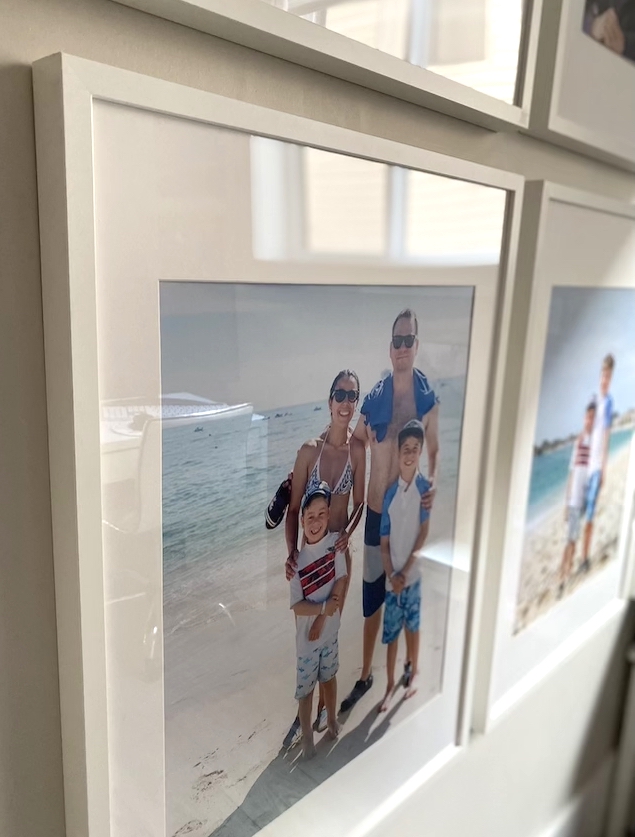
For this project, I picked the photos, got them printed and ordered the frames. I tried to pick photos that had similar colours to stay consistent with a colour theme, I also picked sunny, bright photos that made me happy to look at. My husband did all the measuring and hanging of the frames for me and he wrote all the instructions here so you can easily follow along.
If you end up making your own Gallery Wall we would love to see it. Please share it with me on Instagram! Can’t wait to see yours!


20 Comments on “Easy DIY Gallery Wall Tutorial”
Oh wow so cool. Thanks for posting this. I love it 🥰
I’ve been fantasizing about a gallery wall since I first saw you post yours on Instagram. Maybe time to send this to my husband hahah
Thank you for the guide, so neat!
Love your gallery wall! Thanks for sharing.
I was just admiring this on your Instagram! I do love it, too!!! And I’m thinking it wouldn’t be too hard to change it up as time goes on and you have new photos you love and want to use!
I always forget how fabulous IKEA frames are until I go there. Thanks for the great wall idea!
A gallery is high on my list of projects- thanks for these tips!
I have always been curious about the wall in your office (and enjoyed seeing the images you have changed out)… Thank you for the tutorial.
This is an amazing idea. My problem is I tend to forget to print my pictures now that they are all digital.
I would love to do a photo gallery wall. Thank you for sharing your tips.
Will be going to IKEA next week and will check out their frames, I’m thinking of doing some kind of display going up the stairs.
oh I really want to do this to my upper family room!! people could see it right when they walk in. what a fabulous idea
This is a fantastic idea The gallery wall looks amazing
Thank you for this, I was always confused on how to make mine look professional, yet meaningful.
Thank you for including diagrams as well as written instructions; very helpful.
Love that you can switch the photos around!
I love this gallery wall. I want to make one like it – hoping I’ll have the patience to be precise and get good results like yours. Thanks for the instructions.
What color did you use for your walls?
That wall looks great! Thanks for sharing.
Hello. Thank you for the article. It’s interesting for me.